Contributing
This guide targets new members who are keen on contributing to the project. This guide will focus on the overall picture of effective coding and contributions. It is not intended to be a technical guide. Please refer to the tutorial, “Our Stack”, or the FAQ for better understanding of the technical skill-set needed for RoboCup.
If you don’t have an overall idea of what the competition is like and what its goals are, you can brush up at the RoboCup Wiki.
To contribute to the codebase, you must know how to use Git, create Pull Requests, and document with docstrings. The following sections will give you some basic information about each of these, as well as additional resources to learn more about the topics.
Git
We use Git as our version control system (if you already know git, you can skip ahead). A version control system allows many people to code for the same project at the same time. A “cheat-sheet” of Git commands can be found here.
To ease new contributors into Git, I’ll repeatedly use the analogy of the classroom test.
If you simply want to learn about the workflow we use, and are less interested in learning the relationships between Git elements, you can skip to the “Overall Workflow” section.
Master
If Git is like a test, then you can think of the master branch as the final copy you submit for grading. This copy should have the correct answer, should contain the most effective or efficient solution, and should be highly neat and readable for the graders. You probably shouldn’t do any work here, but rather should explore in other locations such as scrap paper. Once you have several solutions, you can pick the one you like the best, and more neatly copy the work on to the test you will hand in.
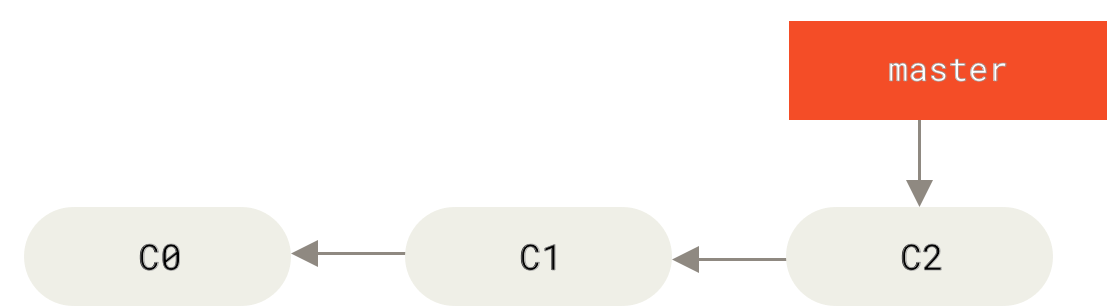
Example of Master Branch
Our master branch which is named ros2 can be found here. The code in latest ros2
is always neat and untouched. It can always compile. When you first clone our
codebase from git to view the simulator and soccer, you are using the code in
ros2. It is in all respects, the master copy from which all other
contributions are derived. Even if you are eventually given permission to write
to master, you should never do so.
Branches
Branches are like pieces of scrap paper. You can use them to organize your work and solutions to the test questions. You should not have work regarding different problems mixed across several pieces of paper; you may get your progress confused. You should use one (or several) pieces of paper for each problem you are trying to solve, but should never use one sheet for multiple questions.
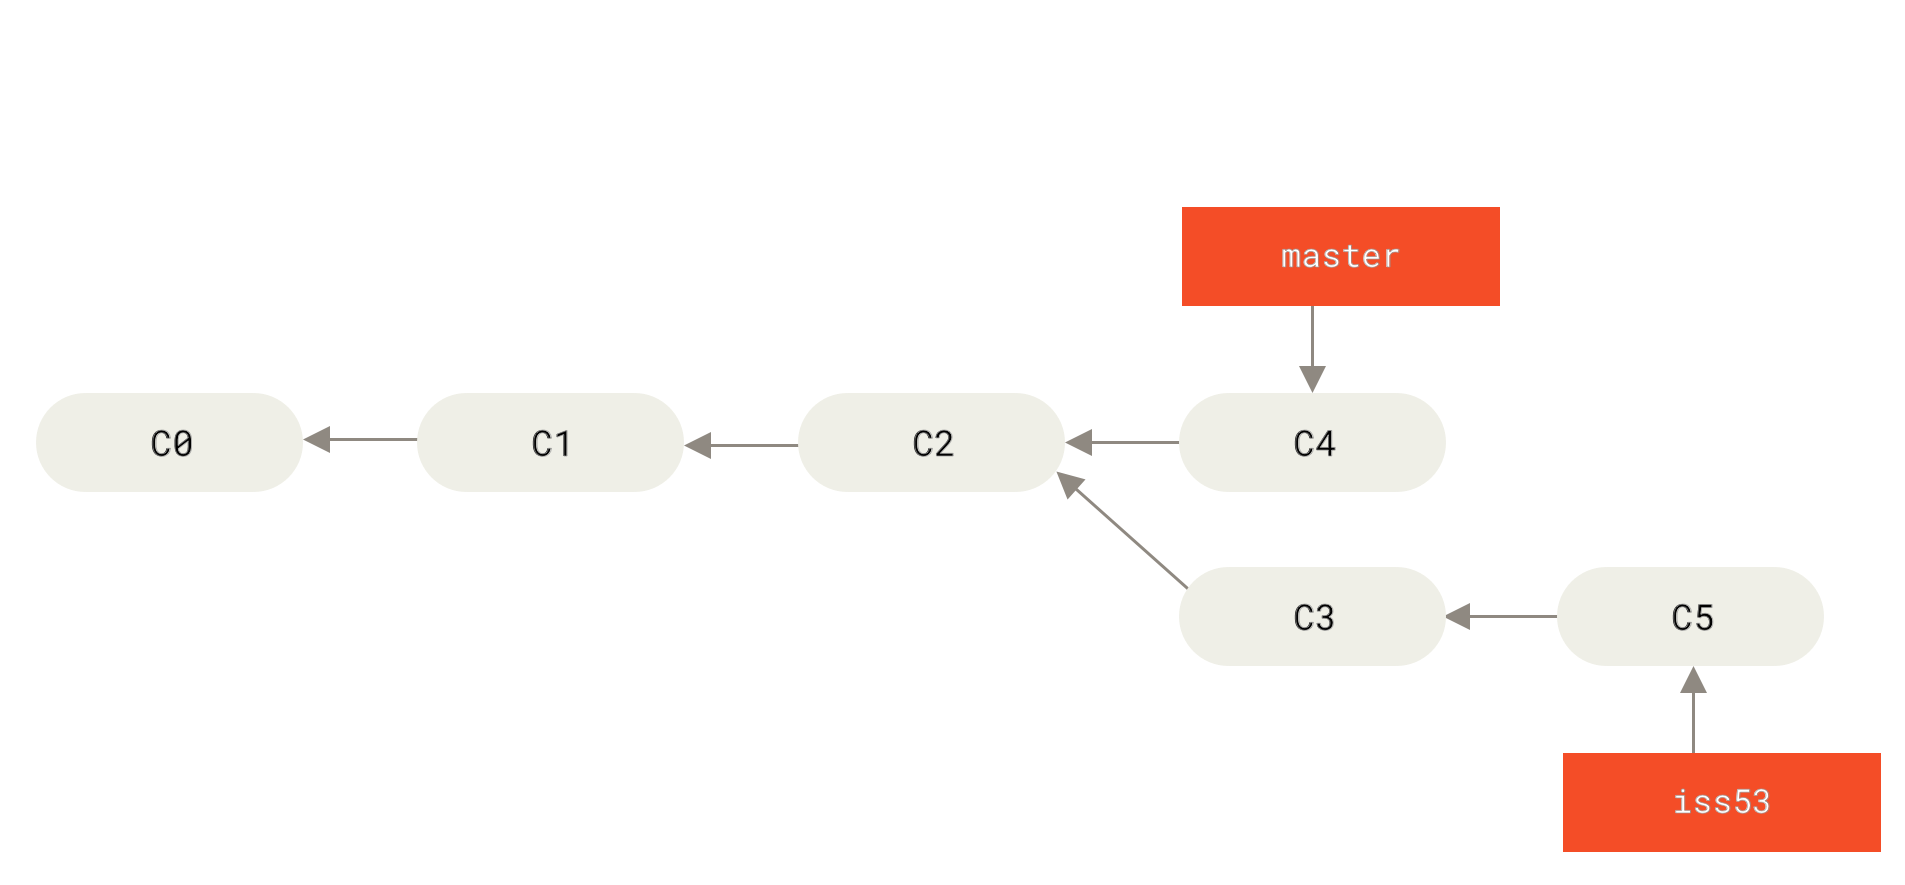
Creating new branch to work on an issue. Note that CO and C1 are commits to the master branch. A commit is the building block of a project timeline. It captures the state of a project at a certain point in time. Read the Tutorial page for information.
For RoboCup you should create a new branch for every new item you’d like to work
on and for every bug or issue you have to fix. This ensures that the ros2
branch stays clean. You should never solve more than one issue at a time. Here is
an additional resource for git branching.
Overall Workflow
If you read the previous sections, you may be a little overwhelmed. This section will describe how these elements interact to form a coherent workflow that will allow you to make contributions more easily. You can view an overall diagram of how data moves between team members and GitHub.

Multiple developer Git workflow
Clone the repository from the link in the master section of the doc. You now have a copy of your repository’s master branch available to you. When you have an idea of what you’d like to contribute, create a new branch before starting work.
Your new branch contains a copy of the content of master. Make your additions and edits now, they will only affect the new branch. When done add and commit the files.
You now have a branch with your contribution, but you haven’t contributed until the code makes it into the main repository. This involves several steps. First, any changes others have made in the team’s repository need to be merged into your code.
Tip
If the work done on the branch stretches over a long period, it is good practice to frequently merge the master branch into your personal branch.
If there are any conflicts that Git can’t resolve automatically, it is your job to resolve those errors. By merging changes into your contribution, rather than the other way around, you ensure the act of bringing your code into the team’s repository will go smoothly. This helps when another member of the team reviews your code as well.
Now that you have a merged branch, you should push the branch to your GitHub. From GitHub, you can make a pull request from your repository against the team’s repository.
Note
A link to a edit a pull request is also automatically generated when the branch is pushed via the command line. You can use this link to create the pull request.
Pull Requests (PR)
Pull requests are how we are able to review each others changes to the master
branch. It helps you communicate your changes to ros2. You can choose to
create a pull request that is ready for review or draft a pull request. Draft
PRs must be marked as “ready for review” before they can be merged into the
master branch.
Once your PR is ready for review, assign an older team member to review the PR. This will notify them that you are ready to have your contribution reviewed. Requirements for pull request standards are listed in several sections below. The team member may ask that you fix or touch up some things before the request is accepted. This is normal and common. Once the pull request meets standards, the older member will approve it, and your changes can be merged (provided they pass the CI checks, which are explained below).
Keep in mind, you can have several branches at once. If you need to fix a bug for an existing contribution while working on a new one, you should checkout the master branch, and then create a new branch named bug fix. It is critically important that a pull request only addresses one thing at a time. If it does not, the request will not be accepted until you have properly separated the items you have worked on.
Pull Request Requirements
With large projects, organization and structure can break down fairly quickly resulting in some bad spaghetti code. We want to avoid this as much as possible. For this reason, every pull request must be reviewed with patience. Follow what the tests and descriptions say to test. It is imperative that you check to see everything compiles and functions as described by the PR.
If your request isn’t accepted right away, don’t take it personally. Often your code may work fine, but there are things you can add or refine. This helps keep our repository clean and will give you valuable experience participating in a code review process.
Continuous Integration
Continuous Integration (CI) is a tool to help auto-detect problems before they are merged into the main repository and have a chance to cause problems. Every time you submit a pull request, our CI tools run and will assign a passing or failing mark to the request. If the CI fails, you will need to fix the error in your code before the code review.
If the reason for the failure isn’t obvious or it’s a problem in the CI check itself, seek some help.
Content
It’s important that the content of a pull request be kept clean and small. Pull requests should be less than 1-2k lines of code. The code changes should reflect one and only one topic (e.g. do not include two bug fixes in one pull request). Content should generally be kept to code and documentation, binary content, such as images, may be uploaded elsewhere.
The description of the PR should accurately describe what the purpose of the changes are. The associated issue should link any PR or TODOs that are being addressed. A large refactor will require design documents to be written. Steps to test should be a bulleted list that tells your reviewers on how to test your PR, and what the expected result should be.
Docstrings
Code should be documented thoroughly. Generally speaking, you won’t be here for more than 4 years. Many students will come behind you and will need to use the code you’ve written.
Python
Our docs are hosted by ReadTheDocs and are built from ReStructuredText
(.rst) to HTML files. This build process is done by Sphinx. The Python-side
API is done by a Sphinx extension named sphinx-autodoc.
Note
As of the time of this writing, there is no C++-side API docs yet, but in theory Sphinx + Doxygen + Breathe allow this functionality.
When writing documentation for your Python code, it is very important to follow
a guide so the sphinx-autodoc can accurately create documentation which is
found in the “API Reference” page.
In general, a typical Sphinx docstring has the following format:
"""[Summary]

:param [ParamName]: [ParamDescription], defaults to [DefaultParamVal]
:type [ParamName]: [ParamType](, optional)
... :raises [ErrorType]: [ErrorDescription] ... :return: [ReturnDescription]
:rtype: [ReturnType] """
Each class and method should have documentation containing its purpose, what parameters it takes, and what values it returns. Error handling should be described as well: what errors will it produce, and what assumptions it makes regarding the validation the caller performs ahead of time.
Note
Inherited methods in subclasses do not need to have a docstring. Ensure that the docstrings are included in the superclass.
If the issue you are working on is a large refactor or a new concept to the codebase, consider editing or adding to the Our Stack page in our docs.
For more information on writing Sphinx docstrings, see this link.
C++
The guide for C++ docstrings is followed by most C++ files in our codebase.
Include the docstrings in the .hpp files.
The following is the docstring format:
""" /**
 * @brief [Brief Summary of Method]
 *
 * @param [ParamName] [ParamDescription]
 * @detail [DetailDescription]
 * @return [ReturnDescription]
 */
"""
Smaller comments about specific lines of code should be included in the .cpp
files.
Style and Formatting
In order to keep the code more readable, code should be formatted and styled
uniformly. This would be difficult to coordinate across multiple users, so we
have a program that automatically restyles the code for you. Our pre-commit hook
runs make pretty-lines which auto-formats the code.
Note
You may have to readd the formatting changes, and commit again.
You can check if the style is passing by running make checkstyle. If there
are no errors, then you are good to go.